
You want movement. Lift without teasing. A face frame that opens your eyes on camera and in real life. This is your calm, clear guide on how to style a butterfly cut. In the next few minutes you’ll learn quick routines, heatless options, texture tweaks, and a five-day plan you’ll actually keep. Short steps. Real talk. Beautiful results. Because hair should collaborate, not compete.
Understand the Architecture Before You Style
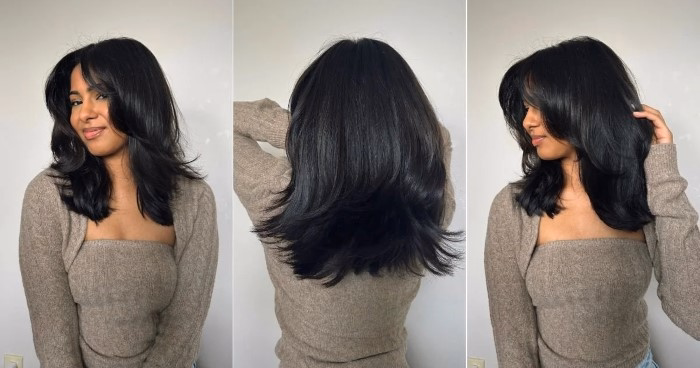
A butterfly cut is a plan, not just layers. Crown pieces are rounded to create a soft lift. Face-framing lengths sweep outward like wings. The perimeter stays generous so braids, buns, and clips still work. When you know that, how to style a butterfly cut stops feeling mysterious. You’re simply supporting the blueprint: lift at the top, outward motion in front, smooth length below.
What the Shape Wants
- Air at the roots, not stiff volume
- Wings that arc away, not flop forward
- Ends that look full, not frayed
- Shine that travels from crown to hem
Your Essential Kit
Keep it light. Let the cut lead.
- Heat protectant
- Root-lifting foam or mousse
- Lightweight leave-in conditioner
- Flexible styling cream for ends
- Flexible-hold hairspray
- Large Velcro rollers (two for the face, one for the crown)
- Round brush (medium barrel)
- Microfiber towel or T-shirt for gentle drying
When you’re learning how to style a butterfly cut, this small capsule does more than a crowded shelf.
Prep: The Clean Start That Changes Everything
Detangle in the shower with a conditioner. Rinse just enough to keep slipping. Part your hair where you actually wear it. Blot with a microfiber towel. Apply leave-in. Add foam at the crown. This is the scaffolding. It makes every routine below faster, smoother, kinder.
How to Style a Butterfly Cut: Quick Routines You’ll Use

The 6–8 Minute Blowout
- Start damp. Heat protectant everywhere; foam at the crown.
- Rough-dry to 80 percent with your head tipped forward.
- Switch to a round brush on the face frame. Blow the front forward first, then split and sweep both sides away from the face to set the wings.
- Pop a roller or two at the crown while you get dressed.
- Release, finger-comb, finish with a touch of cream on ends and a veil of spray.
Why it works: you’re reinforcing the geometry. Learn this and you’ve learned how to style a butterfly cut on any weekday.
Heatless Wings (Passive Time, Big Payoff)
- Mist the front and crown.
- Roll both front sections away from the face; add one roller at the crown.
- Do makeup. Pack your bag. Breathe.
- Remove, shake once, and go.
Perfect for learners figuring out how to style a butterfly cut without heat.
One-Minute Flat-Iron Arc
- On dry hair, pull each front section forward.
- Tap the last inch with a flat iron, then arc outward for two seconds.
- Brush once. Done.
This micro-move restores the wing on day three hair.
Defined Natural Texture
- Apply leave-in for slip; cream or gel for control.
- Clip the crown roots while drying to set lift.
- When fully dry, scrunch out any cast. Wings should arc on their own.
If you’re asking how to style a butterfly cut without losing your curls or coils, this is your anchor.
Butterfly Hair Cut Type Playbook
Because how to style a butterfly cut changes slightly with texture and density.
Straight Hair
Shine shows every line. Use foam at the crown and either the quick blowout or heatless rollers. A pea of cream on the ends only. Heavy oils smother lift.
Wavy Hair
Waves love the pattern. Scrunch in a light cream. Diffuse briefly or use two front rollers. If frizz blooms, glaze a tiny amount of gel on damp hair, then scrunch out the cast later.
Curly Hair
Cut-aware styling helps. Define the two front curls with finger-coiling so they spring outward like wings. Clip the crown roots. Use gel for hold, then soften with a little oil on wet tips only.
Coily Hair
Hydration first. Style in sections. Stretch the two front pieces gently while drying, then release to let them arc. Choose creams that define without collapse. Protect the perimeter—full ends make the shape sing.
Fine or Low Density
Foam at roots, feather-light leave-in, almost no oils. Focus on lift and a clean outward flip. The secret to how to style a butterfly cut on fine hair: protect the last inch so ends look plush.
Thick or High Density
Apply leave-in and a flexible cream through mids and ends, not roots. Use internal clips while drying to reduce bulk at the crown. Choose slightly longer wings so movement floats, not puffs.
Face-Shape Tuning While You Style
How to style a butterfly cut is part engineering, part portrait lighting.
- Round face: add a touch more height at the crown; make sure wings start below the cheekbone.
- Oval face: any landing point works—cheekbone for drama, lip for softness.
- Square face: curve the front in at the jaw before the flip. A C-then-S motion softens angles.
- Heart face: keep a little fullness near the chin; let wings land at or just below the jaw.
- Long/rectangular: reduce crown height; widen the frame at the cheeks for balance.
Color and Shine: Tiny Tweaks, Big Difference
A clear gloss or a subtle glaze helps light travel along the wings. Face-framing highlights one to two levels brighter will spotlight the flip. You don’t need bold color to master how to style a butterfly cut. You need pathways for light.
Five-Day Plan You’ll Actually Follow
- Day 1: Quick blowout. Rollers at the crown while you get ready.
- Day 2: Dry shampoo at roots. One front roller during coffee. Finger-comb and go.
- Day 3: Water mist and foam at the crown. One-minute flat-iron arc on the wings.
- Day 4: Air-dry refresh with leave-in; clip crown for ten minutes, then release.
- Day 5: Low clip or braid. Pull a few face pieces loose. The outline stays soft.
This is everyday proof of how to style a butterfly cut with consistency, not perfection.
Troubleshooting: When Things Go Sideways
- Wings won’t hold: hair was too wet or products too heavy. Start with 80 percent dry hair and use foam, not oil, near the front.
- Flat crown by noon: use two rollers at the crown and let them cool fully. Clarify weekly if you use dry shampoo often.
- Flippy ends look wispy: you’re over-smoothing. Pinch a touch of cream only on the last inch.
- Frizz on humid days: layer foam, then a small glaze of gel on the outer canopy. Let it cast. Scrunch out later.
- Too puffy on thick hair: focus product on mids and ends. Finish with a cool-shot pass to close the cuticle.
Learning how to style a butterfly cut is really learning small corrections. Tiny moves. Big calm.
Workout, Weather and Camera Days
- Gym morning: braid or clip the back; leave the wings free. After, blast roots with cool air, one roller at the crown, go.
- Windy commute: low twist with face pieces loose. The flip returns the moment you’re inside.
- Zoom calls: brush the wings forward, split, and sweep back. Two seconds. Fresh frame.
- Evening plans: one-minute flat-iron arc, a sheen of spray. You’re out the door.
This is the practical side of how to style a butterfly cut—real life, not a photoshoot.
Protect the Architecture Overnight
Silk pillowcase. Loose pineapple or a soft claw clip at the crown. In the morning, shake, mist the front lightly, and redo the two front rollers while you make coffee. The reset takes less than the scroll you’d otherwise do.
Salon Day: Keep the Cut Working for You
Bring notes. Tell your stylist what worked, what fell. Ask for protected ends, rounded crown lift, and wings that land exactly where you liked them. How to style a butterfly cut gets easier when the cut is tuned to your habits.
Mini Guides for Specific Goals
More Lift
Use foam at the roots and over-direct your round-brush passes. Let rollers cool while you finish getting ready. Touch nothing until cool.
Softer Wings
Use a larger roller and less tension. Finish with a whisper of cream rubbed across your palms, then lightly pat the last inch.
Sleeker Finish
Blow the surface downward at the last minute. Aim airflow along the shaft. Add a clear gloss spray only on the outer layer.
Romantic Texture
Twist the two front sections away from your face while damp. Let them set as you do makeup. Release and separate with fingers only.
These micro-recipes make how to style a butterfly cut feel personal.
FAQs
What’s the fastest way to bring back the wings on day three hair?
Use one front roller per side while you dress, then a two-second flat-iron arc on the ends.
How much product should I use at the crown?
Less than you think. A palm of foam is enough. Heavy creams live on mids and ends, not roots.
Can I style it fully heatless?
Yes. Mist, set two front rollers, clip the crown, and let time do the work. That’s how to style a butterfly cut with zero heat.
Why do my ends look thin when I style?
Too much thinning at the hem or too much oil. Keep products light and focus shaping higher up.
How often should I refresh the face frame?
Every 4–6 weeks if short. Otherwise align with 8–10 week trims.
You don’t need a long routine to feel put together. You need a structure that cooperates. Learn the lift. Set the wings. Protect the ends. That’s how to style a butterfly cut with kindness and consistency. Small rituals. Big payoff. Hair that lets you breathe and get on with your day.